Major Project - Apocalyptic Factory
For the Final Major Project, my chosen theme will be in a “post-apocalyptic” setting. The scope of this project will be the creation of a Laboratory/Workshop setting as an inspiration from this project will surely assist me in achieving my goal of capturing the atmosphere and overall feel with the final product.
The first step will be the “Prototyping Stage” of the project. The main focus will be the interiors that I will be designing on paper first. I have gathered some reference images of what I want for the overall atmosphere I am trying to create…

Inspiration: Fallout 4's Industrial Complexes


This playable level is inspired by the fallout games. The level will feature a “rusty” and “grimy” look with a some stylistic design. Playing Fallout 4 has sparked my love for the post-apocalyptic genre, especially the ambience it gives out roaming the wasteland’s industrial complexes. I am also inspired by the industrial setting Fallout 4 has to give: the manufacturing plant “Corvega Assembly Plant” and the game’s DLC “Automatron” interior setting has given me the inspiration and ideation to create the interior with some details similar to their respective environments.
Moodboards
These moodboards represent the overall look I’m looking for in my playable level, most (if not) all objects will be made using Maya and Zbrush. All assets will be then exported as FBXs or OBJs and then imported into Unreal. Each object within the level will have a description of how each and every one of them are made, it will either be presented either via textbox describing in great detail for every method – from rigging to sculpting.


Top Down Maps
These top-down views of the level represent two aspects of the level: an Exterior and Interior. I will personally begin with the Exterior.
.png)
This part of the level will feature two blocked tunnels and a road textured with cracks connecting the two, the tunnels will be blocked my rubble (mainly rocks and boulders) which I will model using Maya and/or Zbrush. The player will start at the middle of the road. The road is also connected to the Parking Lot of the factory. It will feature, rocks and boulders as well, rusted car frames and chassis, lampposts and textured with cracks similar to the roads. And Finally three paths leading to a locked gate, the main entrance to the factory and the ramps to the roof of the factory.
.png)
.png)
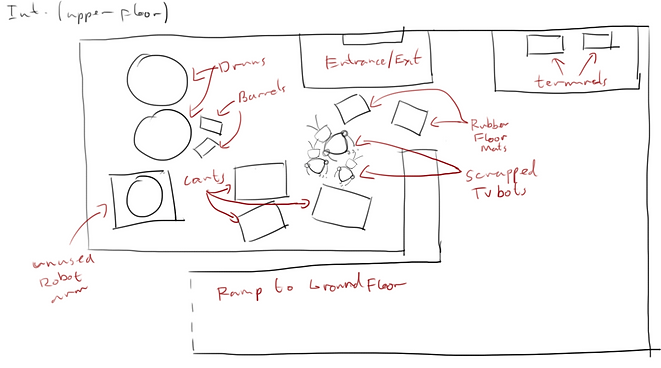
Once inside the factory entering from the main entrance outside within the parking lot, the player will then end up on the upper floor of the factory. This floor will feature minor clutter and spare parts of robots, drums and barrels full of radioactive material and unused carts, as well as inactive terminals/computers. Going down the ramp, the player will be able to see the factory’s full operation, although it is de-commissioned, it will feature detailed models that will be fully sculpted and modelled by yours truly. There will be a rigged robot arm, animated to have a “malfunctioning” motion, a production line with manufactured “TV Bot” heads, inactive “TV Bots” (that I have previously modelled using Maya), More barrels and large drums, a cart on tracks leading to the manufacturing bay, terminals/computers and more scrap piles.
Greyboxing
I have captured video footage of me showcasing a tour of the greybox level. Nothing serves any form of function yet as this is the first stage of the project. I am merely showcasing the layout of each individual object. Each of them of will be done using Maya and Zbrush (where applicable) as well as texturing using Substance Painter. The atmosphere is not an accurate representation, I will be adding a much greater detail when all the models have been made and textured.
Exterior Greybox
Interior Greybox
As you can see from the videos above, the exterior models will feature some of the items described from the top-down view drawings of the maps, albeit missing some models. Rest assured that these models will be created, they are being modelled as of right now, beginning with the car frames which I will be going through step by step from modelling to texturing. The first video is the exterior, I failed to mention on the roof of the factory from the top-down view, that there will be a model of a robot that I have made using maya. This robot will also be rigged and animated. And in the interior, I have tried to represent the top down map as accurately as possible with the greybox, some objects (robot arm) will be animated. In addition to the animation and rigging, the level will also feature special FX such as smoke, mist, volumetric lighting, as well as normalising of cracks and rocks on the floors.
Vehicles


This week, I have produced two vehicles a car frame (with no wheels) and a steamroller. Both models were made using Maya using a variety of basic techniques such as extruding and creating new edges. The models are not textured as of yet, however with the disposal of resources, I should be able to create new textures for all my models. But first, I need to create more models before I can move on to texturing. As you can probably see, I am not going for the realistic approach when designing the vehicles, with the stylistic design, it will fit with the overall environment when the level finally takes its shape. In addition to the overall design, since both models are not combined yet, I will be texturing this model piece by piece using substance painter as well as adding more detailing such as cracks on the wind screen, broken wheels (possibly a flat tyre) as well as overgrown vegetation.
Tools and Techniques: Creating the Robots
For Maya, I will be using a variety of tools and techniques to create the robots. For arms I used a simple cylinder poly, using bevelling as well as extrusion. To bend the arms, I use the nonlinear bending tool to create a natural look for the arms. For the animation, I have to rig the robot using the Human IK then animate some motions to bring the models to life. For the whole body, head and legs, I used extrusions along with smoothing as well as bevelling.
Tools and Techniques: Creating environmental objects


For the environmental objects such as trees and rocks, I will also be using maya. To start of with the rocks and boulders, I began with a cube poly, using the smooth tool, I was able to add more polys onto the model allowing me to reshape it - adding more deformities with the move tool and the soft selection enabled. As for the tree, I used a cylinder poly. By continuously extruding it, the tree started to take shape - extruding the top of the poly into three separate pieces to create branches with smaller ones protruding from them, by reducing and extruding one of the branch faces and selecting the edges, I detached the face and reduced the size, rotated and moved the face of the small branch farther away. I then proceeded selected all edges and selected the bridge tool to connect the branch onto the tree. I adjusted the settings to blend and added more subdivisions to create a smoother, stylistic appearance.
Navigating (Work in Progres...)
To end this video, the level will be fairly easy to navigate, the idea being that some interactable objects will have a “marker” that will let players know that those objects are of interest. The original plan was to highlight the object but I feel that it would affect the visuals of the game itself, so a marker floating above the object will be the better alternative. The other idea was to create a top down minimap, but with an interior level, the minimap may prove to cumbersome for navigating a smaller area. This currently a WIP and will be addressed as soon as modelling, texturing and scripting are planned.
Pre-Visualisation Video
MAJOR CHANGES TO THE PROJECT!
Due to time constraints, I am making a MAJOR change to the project. I will no longer be making the interior. I have found out that the extra details needed to create the interior section of the level would require minute details that majorly impacts the project, therefore the interior is now scrapped from the final product. However, this does not impact the exterior section of the level, more it is still a playable level and the factory’s will still be located in the general area as well as the models I have created below. The models that have been excluded will be as follows:
-
Robots
-
Terminals
-
Machinery
-
Interior walls
-
Carts
-
Cart Tracks
-
Crates
-
Platforms
-
Ceiling Lights
-
Navigation
.png)
.png)
UV Unwrapping the Models
Camera Based Cutting


Using the car as an example, the UV unwrapping for this model is fairly simple. I was able to unwrap with ease. I started with positioning the model in a specific place and orient the UVs within the UV editor in a way where I can see the model, I did this by selecting the model (the car body first) and select Camera Based, this will create new UVs. I proceeded to select the edges where I want to unwrap. I then selected cut and then from there, I selected UV shell and moved the car body away from the newly cut UV. That cut UV will now be unwrapped, stacked, and oriented and then laid out and resized appropriately.
Auto Unwrapping


UV unwrapping is a key step to texturing and especially using Substance 3D painter, Auto Unwrapping was another feature I used for the smaller and minor pieces such as the bumpers, grille and the brake pieces I resized and laid them as well to fit well into the editor. Auto Unwrap was used for smaller objects these, and for extremely detailed polys such as the train and most vehicles' body parts which mainly used camera based UVs.
Stacking, Unstacking and Laying out UV shells + Checker Map


I have done this several times for major parts of the car. Some of the UVs are on stacked on top of each other – this is because they are essentially the same piece and if not stacked, it could take too much within the UV Editor. I have also positioned upright to follow the orientation of the texturing to make it consistent with the shape of the car. Another feature to help to determine the texturing is sufficient enough is to turn the checkerboard in the Editor, the checkered texture in the car has to a “Perfect Square” when shown on the model, the squares have to be fit in the model just right otherwise when the squares are stretched, when texturing in Substance, the textures applied will also be stretched.
Separate Lambert Materials

Each material coloured is as follows:
-
Grey: Lambert1
-
Green: Lambert2
-
Blue: Lambert3
-
Cyan: Lambert5
-
Pink: Lambert7
-
Orange: Lambert8
Once all the UV unwrapping is finished, I selected the Window face of the car and changed the material, this will allow me to texture them separately in Substance, I did this for the brakes and grille as well. I finally exported the model into an FBX and finally textured it using Substance.
Texturing using Substance 3D Painter
Texturing the Models
.png)
.png)
.png)
.png)
.png)
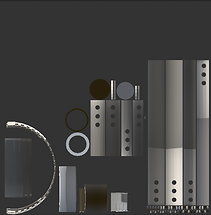
I will be using the Steamroller for this demonstration of the texturing process. Using Substance painter is simple; however, texturing can get very complex especially when using Smart Materials. With the availability of textures and pre-made smart materials on hand, texturing is made convenient for me. There are two ways for me texture the model: one is to simply paint over the UVs or the model itself using the brush tool when selecting the layer. And simply dragging the material and/or smart materials onto the model, UVs or the Layers section.The pictures above are the base model of the Steamroller with some of the UV Shells separated. Each UV is separated using different materials applied within Maya.
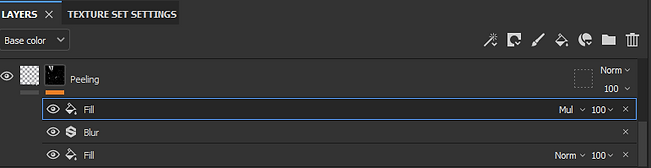
Making my own Smart Material w/ Anchor Points
.png)
.png)
.png)
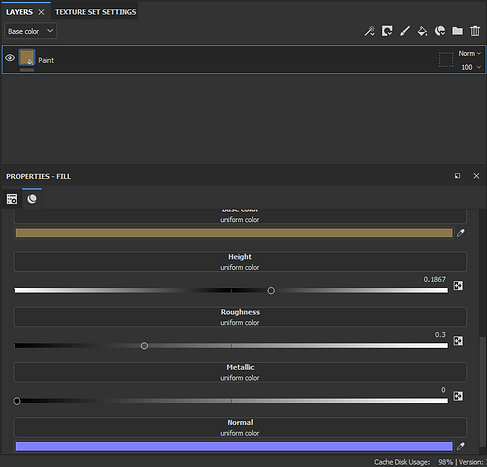
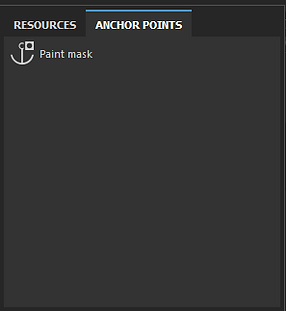
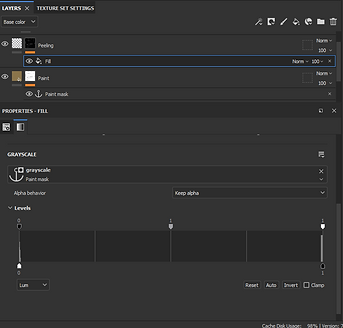
Making my own smart material was quite complicated, when playing around Substance, I found out that you could actually make your own “paint peeling” material that seemed very fitting with the overall look for my level. I first started off by deleting the default layer and replacing it with a Fill Layer and renamed it Paint, I placed a black mask on it and placed a “Paint Old Small Cracks” from the smart masks tab on the Asset. This means that I am allowed to reference it to other layers. And with applied smart material, I then set the invert to true. From here I added an Anchor Point.
.png)
.png)
Anchor Points are a feature within Substance that will allow me to re-use the layer stack that I have applied onto my models, this gives texturing more added convenience and ease. I renamed it “peeling” and disabled all the material features except for the Height and set it slightly higher than the default. By adding another Black Mask and adding a Fill Layer, on the Grayscale tab of the fill layer, clicking on the Anchor Points tab will allow me to finally reference the Anchor Point applied on the Paint layer. On the levels, I then clicked on invert, this allow the height to sit outside of the mask.
For additional effects, I added a filter that will add a blur between the paint cracks, however it is inverted. By adding another Fill Layer with the previous anchor point and finally, setting it from Normal to Multiply. And for the final touches – as a base, I then added a “Steel Rust and Wear” from the materials tab which will act as the steamroller’s original material, I adjusted the roughness to give it a metallic shine, increased the surface imperfections, dirt intensity and height. I also Added additional textures such as stripes, danger and cautions signs.
.png)
.png)
Once all the texturing is finished, I took the liberty of renaming the pieces on the texture set list. I have realized that it may have been easier to rename them during the modelling process in maya as it can cause some confusion when applying the textures in Unreal, as I will demonstrate below. However with the renamed textures, it will be easier to find them when importing into Unreal.
3D Models - Final Renders
Steamroller
.png)

Here is the final render using the built-in renderer in Substance, additional textures such as the same Smart Material for the body was used for the front wheel attachment and exhaust pipe, the same Steel and Rust wear were used for the front wheels and the back rims and rear diffs. Plastic and Rust Fine was used for the step ladder, a pre-made smart material called Rubber Tire Dirty was used for the tires. And for the windows a combination of a pre-made smart material called Glass Visor and Steel and Rust Wear was used to create a dirty window effect for the vehicle. Alongside the model are the base 3D model render in Maya as well as the UV Shells.
Freight Train


The Freight train consists of complex pieces. Some have been extruded from the whole body as well as deleting and creating a new face to get rid of creases between edges. Some pieces cannot simply be a new piece however – they need a separate poly shape in order to get the proper look I want for the model. The model now different separate pieces, specifically the wheels and tanks. This will make it easier for UV unwrapping as well as texturing. Much like the Steamroller, the train has assigned materials to differentiate the textures when imported onto Substance. Similar materials from the Steamroller were used to texture this model as well. the whole body with the self-made smart material "paint peeling" texture, and the rest were used using the Steel and Rust Wear (with different colouring for each object) with the windows and headlamp with the pre-made Glass Visor smart material.
Thorn Vine 1


Thorn Vine 2


The Thorn Vines were really simple to create, I started with a cube poly and detached the top face, much like the trees I created earlier (See Above). I rotated it to face sideways and moved it slightly to the side. I selected the edges of now detached face and the hole of the cube poly and by using the bridge tool, I connected the face and cube together and by adjusting the divisions and changing the curve type to blend, I was able to create a waving effect to the root, making it more natural looking. The textures used for the vines were the creature skin pre-made smart material as well as a material called Wood Rough. I changed the colour to green for both vine models. The thorns attached to the base body of the vine also uses the same material but contains a different colour.
Trees


The trees have already been created, although I create a much simpler tree later on, the same method was used to create them. All I needed to do was the texturing; I simply just used the Wood Rough material as well as adding a slight rust effect to add the “dead” look of the trees. I have also darkened the colour as well. Finally I added a Concrete Simple from the materials to further exaggerate the coarseness of the trees.
Car

The car was similarly made to the vehicles, I have already detailed how I made the car (See Above) the textures I applied to the car was the smart material paint peeling that I created from earlier, I painted the car a red colour instead of the yellow I used for both train and steamroller. And the smaller details also the Steel and Rust Wear Material, as you can see not much texture went into the car as it was very simple as most low poly models go.
Train Car and Container


The freight train will need a car attached to it add more detail. I created this simple car with a separate container on top of it. Seeing as they are separate pieces, this gives me more freedom when placing the models into Unreal. Also you can see that this cart does not have wheels, this is because once I have imported the wheels from the freight train, I can simply use the separate wheel pieces from that model, duplicate it and use it for the train cars. Same textures again were used for the train car and container the paint peeling smart material both coloured red and dark grey respectively.
Barrel


The barrel was again just as simple as creating the car, it just matter of extrusions when it came to creating the lid and the rest of the body was just using extrusions again for creating the indentations around the sides of the barrel. The textures used was the smart material that created earlier: the paint peeling. In addition to the textures I applied a alpha mask on the side of the barrel with a radioactive symbol to fit well within the environment.
Rock 1

.png)
Before
After
Rock 3

.png)
Before
After
Rock 2

.png)
Before
After
The rocks have already been made and textured, however I changed the textures to add some more variety to them. Previously, they all the same concrete textures, but this time around I adjusted the height to a higher level, adjust the roughness to give a small amount of shine and changed the colour to fit the radioactive environment. With the new look they look more apocalyptic than the previous look.
Factory


The factory was another simple model to create, I started off with a cube poly and added an edge in between it, I raised the far-left edge of the now stretched cube and created a slanted roof. As for the front, I just extruded twice to create a more detailed look. After that, I bevelled the corners of the factory to add curved edges. And using my knowledge from the First Year’s NY Rooftop coursework, I was able to create a vent using extrusions and bevelling. I then added a gate and glass door at the bottom front of the factory, these were separate pieces.
Other separate pieces such as windows were added as well as the tank next to the vents on the factory rooftop. Texturing the factory base was simple, I changed the base colour of the height on a fill layer to a brick generator texture and adjusted it to create added roughness and realism on the textures. Other pieces such as the gate used Steel and Rust wear and windows and glass door were using Glass Visor smart material accompanied by the Steel and Rust Wear material to add dirt and detail, the vent used Galvanized Iron with added grunge intensity as well as rust and finally my own paint peeling smart material on the tank’s texture.
Truck Cart
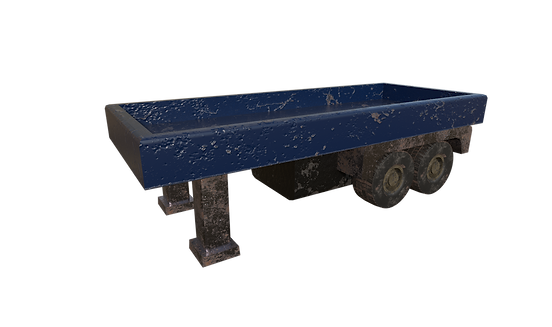

The truck was again very simple to make, using what I did for the train car, all I did was extrude and bevel the base of the cart, some pieces were separate such as the stands, the bottom piece, wheels (Tires and Rims) and the wheel arches. Starting with the wheel arches, all I used was a cube poly added four extra edges, moved them to the far end of the cube and bevelled both outside and inside edges to create a curve. The bottom piece was another cube poly with two bevelled edges and the stands are two cube polys with four bevelled edges as well as extruded feet. As far as texturing goes, it was simple, the paint peeling smart material was used once more, the steel painted was used for the bottom piece, Steel and Rust Wear was used for the rims, wheel arches and stands. Rubber dirt – much like the steamroller’s tires – were used.
Foliage - Grass & Leaves

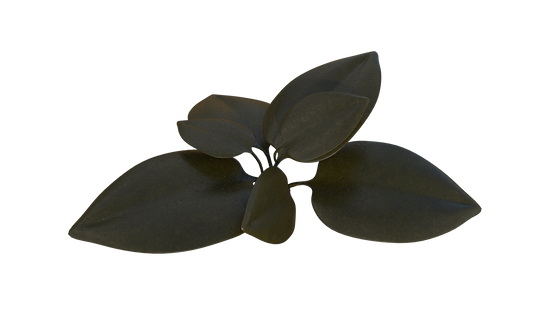


The leaves and grass were fairly simple to make, to start with the more complicated ones, the leaf was made a polygon tool and drew out a profile of a leaf, I then added the details onto it imitating stems, and finally deformed the leaf using a lattice that will allow me to bend the leaf to create a more natural look. As for the grass, I just used a cube poly and extended, added new edges, and reduced the tip size and re-shaped it for the natural look. When it comes to texturing, I just used a leather material to imitate the chlorophyl texture of the leaf and grass and added a creature skin to create the mutated look. Another factor to point out is that I reduced the poly count for the leaf as it caused some frame rate drops within unreal (see below for more details).
Train Tracks w/ Stopper


The rails will be the final piece required for the train, consisting of cube polys, extrusion, bevelling and re-shaping them are the only techniques required to create the rails, I started off with the concrete beams, I extruded the faces on both ends of the top side and resized it. Then the rails itself were made, but left and right sides were given two edges each creatin a new face which I then pushed into the poly. Finally, the stoppers – the concrete blocks were simple two pieces of cube polys, with the bottom edges moved back, the warning sign which is nothing more than a resized cube poly and lastly the stoppers which are just a simple cylinder – nothing more.
The texturing is simple and using smart materials is not necessary. The rails and the two stopper cylinders were textured with a steel and rust wear material, the concrete beams and stopper stands were simple concrete the warning sign was simply a fill layer with yellow and black stripe texture and the two cylinders.
Pipes


The pipes were very easy to make, with a cylinder poly and a small cylinder poly, I was able to bend the pipe by selecting both the small and large poly pieces. And by selecting the faces of the large cylinder poly, I then selected the edges of the small cylinder poly, and by using the wedge tool, I can simply bend the large pipe to however I want. In this case a small amount of bend and edges to create minor details on it, I also took the liberty of adding dents for more a detailed look. When exporting into Substance, I just simply placed a steel and rust wear material for both the pipe and the dents which I coloured black
Wooden Plank


For the wooden plank, I simple placed a cube poly with added edges. I then carefully moved these edges to create bends on the planks sides to create a more natural look. I also bevelled the four corners slightly. After modelling I textured the planks similarly to the trees - with a wood rough material. And I also added extra roughness and darkened the surface to create an aged look.
Final Models


These models were the easiest to create the first two pieces above is the fence and its supports, all it took was simply adjusting the added edges on the poly and extrude the top for spikes, the support bar was the same, except the spikes are not necessary. I textured both (separately) with steel and rust wear with a significant amount of rust and dirt. And as for the parking lot, I just placed a cube poly and flattened it and increased its overall size. I then imported it into Substance where I added a concrete texture on it and applied alpha mask to draw parking spaces.
Unreal Engine 4
Creating the Level - Landscaping

Creating the level is not as complicated as it may seem, however it does have some caveats that come with it, like exporting and importing some models, that causes “tangent errors” as well as overlapping UVs. But before exporting the levels, I have to create the base of the map, and that is to simply to apply a landscape, the size for this landscape will be 16x16, as you can fairly see it is not too large. Once filled with the vegetation, assets I’ve created, the level may feel encroached with the apocalyptic feeling. I also applied lighting so I can see the sculpting much easier.
As you can see from the image above, the landscape has hills surrounding the general area, I used a variety of sculpting tools, the first tool I used was the sculpt tool to raise the ground to imitate hills, however by simply using this does not achieve the proper look I’m striving to achieve. To combat this, I used the erosion tool that slightly flattens and adds ragged edges to the faces of the hill/mountains, but it does not have the roughness I’m looking for, so noise tool was used – I adjusted the intensity and I started to sculpt away. I left one flat area out so I can place the factory on there.
.png)
.png)
Another tool I used to create the holes on the ground was the flatten tool, I started with reversing the sculpt to lower and then around the edges, I flattened those areas. Some of the lakes/puddles did not have this flattened edge. Before the final stages of creating the landscape, I added water. I added placed a basic plane actor into the scene and applied a simple water texture. This however seemed to flat, so I looked for free water textures in the asset store and found a more appropriate water texture, applied it to the plane and recoloured it a green-ish colour to imitate toxic water.
Importing and Exporting
.png)
.png)
Before I get into the details of asset importing, exporting objects may come across as easy however without the proper settings, I have found out that it can cause some potential errors. I wanted my project to be free of these errors so therefore I did some research as to why some of these why these are happening. First of all, I exported the object as a simple FBX rather than the usual “Send to Unreal” option within Maya. This has caused some issues when imported into unreal, with a “degenerate tangent bases” error. To prevent this, I went to maya and before exporting, I ticked the box that says Tangent and Bi-Normals and the potential error is cleared up when re-importing the asset.
.png)
.png)
Now importing process is simple, rather than exporting all from Maya, I just clicked export selection, and saved it to the desired folder. Exporting via selection was used so can control what goes in Unreal and apply the objects piece by piece (This particularly important when it comes to finally importing the train as I will be reusing pieces from the train onto other attaching pieces). I imported into unreal by clicking the import button in the content browser, I did this with all the assets, including the textures I need to apply to the specific object. The textures exporting is very simple, there is no need to tick any boxes however, baking the textures is required to create proper normals for the object. When baking is finished, I exported the textures into the selected folder and imported them into unreal.
Applying the textures
.png)
.png)
There are two ways I can apply the textures; one is via asset editor and the other by dragging the object into the viewport and applying the textures from the details section, the problem with this method is that the textures will not be applied to the asset by default – so I applied the textures via asset editor.
.png)
As stated previously, renaming the materials via Maya was more convenient instead of naming them “lambert”, naming conventions are important when it comes to texturing in Unreal. However, when importing the FBX files into the engine, the names of the pieces are Lambert and has caused some confusion when applying the textures in the asset editor. In the future I will be aware of renaming the materials in Maya rather than leaving them out!
However, applying the textures are simple, when the textures have finally been imported, it was time to create the material of every piece of the object. I did this by right clicking on the base colour of the imported texture, and from there I opened the material and dragged and dropped the Metallic, Roughness, Normal textures and connected those nodes to the corresponding material. The result is the material is now created I can apply that material to the asset via editor.
.png)
This process was done for the body piece of the steamroller, all of the textures have now been implemented for every piece of the steamroller as well as all imported assets. They have all been placed in their respective areas. All have no errors when exported and some have overlapping UVs which can be fixed via asset editor by simply reducing the UV Channel 1's Min Lightmap resolution by half, in this case it was 64 previously, and by reducing to 32 potential errors are no longer prevalent. some objects such as the leaves were reduced to 16 to help reduce framerate drops (for more info on framerate consistency, see below).
Foliage w/ Framerate Fixes
When applying the grass and leaves, it was a matter of simply just going over to the foliage tool that is included with UE4. I textured the grass and leaves via asset editor (along with the newly imported tree models) and dragged and dropped the models onto the foliage tool, I adjusted just so the intensity doesn’t apply thousands of grasses on the ground as well as adjusting the brush size as I see fit. Some trees and grass have to be applied in specific places, I selected the “single” feature to apply one single piece of foliage like the tall grass and trees.
.png)
.png)
.png)
.png)
I applied a dense amount of foliage around the water areas to create a “swampy” look accompanied by the large thorn vines. The leaves were applied to certain areas on and around vehicles, trees and wooden shacks to emulate overgrowth. I also applied collision on the trees on the details of the foliage.
.png)
.png)
.png)
.png)
.png)
.png)
The problem with applying too much foliage is that it can tank the framerate by slightly or significantly. However, I applied the game with enough grass that I didn’t cause too many problems, the problem lies on the leaves that I made. The problem was that it had too many faces, making the file size rather larger than most of my low poly models. I simply went back into Maya, decimated the object by going clicking on reduce polys by 75% whilst still maintaining its structure, and now the model has significantly reduced the faces. One drawback from this is that the edges of the leaves are left jagged – however it is not very noticeable. The UVs are still maintained and applying the textures to them wasn’t an issue. I then reimported the mesh, and the framerate was no longer affected by the object.
Exponential Fog w/ Volumetric Lighting
Ever since playing Fallout 4, I have been interested with one area of the game, and that is called the Glowing Sea. It is essentially what a fictional re-telling of what a mass nuclear fallout would look like; completely surrounded by radioactive fog that will slowly kill a living creature that isn’t immune to radiation. I stuck with the original plan of giving the level “green mist” that gives a similar vibe to that of the glowing sea mixed with the desert area that is inspired by Nuka World and some instances of Fallout New Vegas. To add to the radioactive mist, I also enabled Volumetric lighting which gives the game “God Rays”. I adjusted the volumetric lighting so it isn’t too bright, and the god rays aren’t too intense – if the setting is left too high the god rays will produce an endless amount of blood that defeats the purpose of the environment I am striving to achieve.
Exponential Fog w/ Volumetric Lighting
.png)
.png)
Whenever I move in very close to an object, the lighting would become dimmer. I fixed this by clicking show on the viewport, scrolled down to post processing and disabled adaptive lighting. However, this only applied to when editing, when playing the game, the problem still remained consistent. To described what happened, much like real life our eyes adjust to darker and brighter areas, adaptive lighting within UE4 emulates this. However, this can be distracting both for me and the player and can cause an inconvenience when roaming the level. To fix this when play testing the level, I simply added a post process volume, changed it so that is it unbound – the whole level is affect and not just being inside the post process volume, and enable min and max brightness, I changed the values to both 0.1, this way the are is still dim enough but the player will be able to see the whole level.
Exporting the train
.png)
.png)
.png)
.png)
.png)
When exporting the train, it wasn’t a major issue but rather a minor one. This is due the separate pieces that I chose to export via selection rather than combining the object into one unlike most of my models in the level. This is because I was planning to reuse the pieces for other objects such as the train car as that required the train’s wheels and tanks as it did not model it to have them. The container for the train car was also separated from it because I plan to use it to position them simulate a crashed train.
Steamroller Rims

The steamroller wheel had a problem with its tangents, however with extensive research on the matter, the problem was caused by the UVs. Seeing as the problem kept recurring for rims - even after deleting and unfolding the rims and have already textured the rim, I was forced to used the truck cart’s rims alongside with the textures that was made specifically for it. Due to a short amount of time left, it may take more of hours to complete the project due to this problem.
New Assets
Since I wasn’t able to create an interior model for the game, I have decided to have small assets that will fill up the level. I have created an attachment for the train and carts, so they look like they are connected, a satellite building with a separate satellite model, and a simple shovel. All were created using Maya and textured through Substance 3D Painter. All the objects used the basic tools and techniques I practically used for the rest of the assets.
Train Attachment 1

Train Attachment 2

The train attachments were simple cube and cylinder polys simply resized and shaped into the proper shape, used Steel and Rust Wear materials once more, with increased height, adjusted roughness and slightly intense imperfection level to match with the train.
Sattelite

Building

The satellite just consisted of a cone with multiple extrusions on the bottom face, as well as cylinders and a sphere – all resized to complete the shape. It was also textured with Steel and Rust Wear with different colours for each piece.
The building was built using a cube with bevelled top and side corners and extruded roofing area, alongside the building, I also built a door with an extruded face as well as a simple cube poly flattened which will act as a “keep out” sign. It is similar to the factory in appearance, a brick texture accompanied by the Simple Concrete material, the door frame was made out of Steel and Rust Wear, while the door itself was made out of Steel Painted with adjust rust height. And the sign was again Steel and Rust Wear, with a “Keep Out” alpha mask textures with the same material used for the sign.
Shovel

And finally, the shovel was made with a simple stretched out cylinder with the spade made from a cube poly but reshaped with the soft selection tool to create bends. As for texturing, I used walnut wood texture for the handle with enabled height and darker brown colour and for the spade piece I used Steel and Rust Wear with a smart mask. The mask used was a simple dirt mask that adds mud to the shovel’s faces. I adjusted the height for this as well to exaggerate the dirt. I placed the shovels on the graves within the level with simulated physics as well.
Final Touches

.png)
The make the level more interesting I added other assets from free asset packs from the asset store (which I will reference below). The assets used were Water Plane which I used the water textures, and Soul: City which I used for the rain and storm sound effect. I have already detailed how I placed the water textures as for the rain, by replacing the default texture of the plane with the water from the Water Plane asset pack
.png)
.png)
.png)
.png)
As for the rain, I simply added the rain particle effect from the asset pack to the player character blueprint instead of placing multiple particle effect actors in the level which can cause framerate issues. As for the sound effect, I just placed onto the level and unticked spatial sound, so the rain sound is consistent and doesn’t reduce volume when walking father away from the sound effect’s position. Another change I made to the player blueprint is removing the gun and the projectile when mouse is clicked, I made the gun invisible, and detaching nodes from the Spawn projectile Blueprint as well as the crosshair on the HUD blueprint
.png)
.png)
I also added blocking volumes around the toxic water areas as I do not have a swimming animation for these. I also added a few more foliage around the satellite buildings as well as another overgrown thorn vine surrounding it.
.png)
.png)
One final change I implemented to the level is the texture for the landscape. Instead of using Sandstone texture for the second base colour, I used ground gravel which adds a small amount of colour variation to the overall land. I also did the same for the normals with the corresponding texture meant for gravel.
Showreel
References
Andrewgray3d (2015) Unity 5: post-apocalyptic house interior. Available at: https://polycount.com/discussion/151812/unity-5-post-apocalyptic-house-interior (Accessed: 20 October 2021).
Isamidinov, N (2018) Post-apocalyptic Interior / POSTWORLD. Available at: https://www.artstation.com/artwork/4OP0k (Accessed: 20 October 2021).
Ferrand, N (n.d.) Environment Concept Art. Available at: https://www.pinterest.co.uk/pin/500040364846875564/ (Accessed: 20 October 2021).
Nix, L (2014) The City. Available at: https://photographyinchicagonow.tumblr.com/ (Accessed: 20 October 2021).
laboratory concept art. (n.d.) Available at: https://www.pinterest.co.uk/pin/311452130458328208/ (Accessed: 20 October 2021).
Rubel, N (n.d.) Concept Artist - Cat Daddy. Available at: https://nachrubel.artstation.com/projects/lV08Eo (Accessed: 20 October 2021).
[FO4] Comparison of different light mods. (n.d.) Available at: https://www.reddit.com/r/FalloutMods/comments/6jx3p7/fo4_comparison_of_different_light_mods/ (Accessed: 20 October 2021).
Roberts, T (2018) New Fallout Style Terrain From TT Combat. Available at: https://spikeybits.com/2018/05/new-fallout-style-terrain-from-tt-combat.html (Accessed: 20 October 2021).
KK Design (2019) Post Apocalyptic District. Available at: https://www.unrealengine.com/marketplace/en-US/product/post-apocalyptic-district (Accessed: 20 October 2021).
Artwork of abandoned factory. (n.d.) Available at: https://www.pinterest.co.uk/pin/218776494377736570/ (Accessed: 20 October 2021).
Cho, S (2014) Laboratory (For Mutant-Z). Available at: https://www.artstation.com/artwork/qAdEL (Accessed: 20 October 2021).
Mad Scientist Lab. (n.d.) https://www.pinterest.co.uk/pin/389139224034049904/ (Accessed: 20 October 2021).
Steampunk Bedroom. (n.d.) Available at: https://www.pinterest.co.uk/pin/103793966385063693/ (Accessed: 20 October 2021).
Survarium Interior wallpaper. (n.d.) Available at: https://www.peakpx.com/en/hd-wallpaper-desktop-aimax (Accessed: 20 October 2021).
Apsey, J (2020) Observer: System Redux PS5 Graphics Showcased In New Trailer. Available at: https://www.psu.com/news/observer-system-redux-ps5-graphics-showcased-in-new-trailer/ (Accessed: 20 October 2021).
Romano, S (2020) Observer: System Redux ‘New Quests’ gameplay. Available at: https://www.gematsu.com/2020/09/observer-system-redux-new-quests-gameplay (Accessed: 20 October 2021).
W-E-Z (2017) Broken Monday - The Demon Code. Available at: https://www.deviantart.com/w-e-z/art/Broken-Monday-The-Demon-Code-679521226 (Accessed: 20 October 2021).
Bethesda Game Studios (2015) Fallout 4. Available at: https://fallout.bethesda.net/en/games/fallout-4 (Accessed: 17 March 2022).