Digital Sculpture
Week 1 - The Human Skull

_jp.jpg)

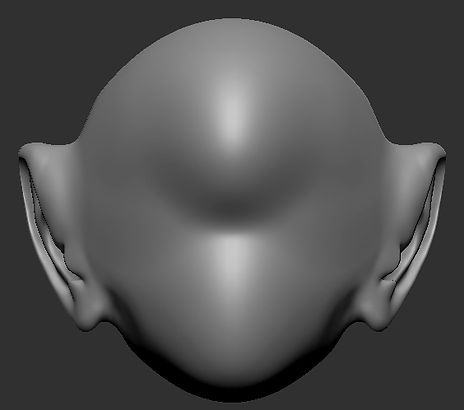
For my First week, I demonstrated the basic facial features and the structure of the human face and skull, and of course there are major difference, especially between the male and female skulls. Firstly, for the first picture, I labelled the structure of the skull such as the cranium, mandible, nasal cavity etc. these are useful information to get started in facial sculpture; using these will help to also create realistic facial features.
The second image demonstrates the structure of female and male skulls respectively. As you can see, there are differences that can be identified, the frontal lobe slope is much steeper on the female whilst the male's are much more curved, the superciliary arches are also steeper on the female's and more defined on the males. The mental eminence aka the chin is much more defined and sharper on the female's and males are steeper. And finally the Gonial angle or the jaw angle is more obtuse on the female's side whilst it's more angled on the male's.
The final picture shows an old man with the frontal lobe slope, superciliary arch, chin and jaw angle are highlighted. However, I wanted to demonstrate that as we grow older, our body parts continue to grow, and some of our teeth may also fall out! as that happens the jaw may move up, as seen with the old man on the picture, his jaw has moved up and shows a lower mouth bite.

The pictures given within this second demonstration shows basic knowledge of tools I used for ZBrush, the tools I used or brushes were standard brush, the dam standard, the clay brush, the move brush and polish (not much of this, however).
I also used the smooth brush to essentially smoothen or "erase" any rough patches or surfaces on the sculpture. I first tried using a mouse to create a facial sculpture, this however, proved to be a challenge and I found quite difficult to use. I then connected my drawing pad to create a much superior model, it may not be the perfect model, as soon as I develop more skills and further my knowledge with Zbrush, I will try to create more detailed sculptures.


.png)
The tools I used for creating sculptures consists of Standard, DamStandard, ClayBuildup, hPolish and Move, I also used the Smoothen brush by simply holding down Shift while sculpting - this works with any of the brushes I used. These are the basic brushes to get started in sculpting. (These tools were also used in creating my first demonstration of sculpting a face. See images above).
To select a brush, I opened the panel on the left side of the Lightbox and used whatever was appropriate. To get the basic shape of the nose, I simply used the default brush, which was Standard. To quickly select that using the keyboard, I simple pressed "BST".
The second brush I used was the Move brush, the keyboard shortcut being "BMV". This one was used to move the nose around wherever I felt was appropriate, I used this to adjust the slope, steepness and length of the nose.
Next brush was the ClayBuildup brush, this was simply to add texture to much like the standard brush. The keyboard shortcut for this is "BCB"
DamStandard was also used to add some texture, primarily to add some creases/wrinkles. "BDS" is the keyboard shortcut.
Finally, the last brush used was hPolish, this much like holding down shift to smoothen the texture, however this was more extreme in terms of smoothening surfaces. "BHP" being the keyboard shortcut.
Week 2 - Sculpting 3 Noses
For this week, we were tasked on sculpting 3 different noses using ZBrush and the appropriate tools and techniques. For this task, I used a variety of brushes to make the nose as realistic as possible; imitating a proper human nose (see below for the description of brushes/tools used for the sculpting process) I've also taken the liberty of adding reference images I could find on the internet, I used these images to help me sculpt the final outcome of the process. I have also provided a video of how all noses were made.
Nose 1


Nose 2


Nose 3 (Final Sculpture)


Some improvements...
For this final sculpture, I made some slight improvements while still using the same reference image. I mainly touched up on the crease just above the alar fat. This makes the nose as realistic as possible. As you can see from the image below the crease is visible, whilst the images above lacks it. I simply use Dam Standard with the intensity rolled back to "10" as well as the brush size to "20".
.jpg)
.jpg)
.jpg)
.jpg)
Additional Research...

To begin my research for the human nose, I started going in depth with the anatomy. First with the Cartilage. The nose cartilage is what defines our noses' shape. As you can from the labelled picture below, there are 3 pieces of cartilage that makes up the human nose, the Lateral, Alar and the Septum Cartilage. The lateral cartilage is essentially the side of the nose and connects with the nasal bone. The alar cartilage is opposite the alar fat and makes up the "ball" shape of the nose and finally the septum cartilage which comes down from the nasal bone and makes up the septum of the nose.

This second part features the Alar Fat, it is also known as the wing of the nose. This part of the human nose is NOT made out of cartilage, hence the name alar fat. Another fact about the wing of the nose is that if one was to lose weight, the alar fat will never lose it, the only way to reduce fat is through cosmetic surgery!

The nose is also made out of three bones, the Nasal Bone, Nasal Aperture and the Anterior Nasal Spine. The nasal bone is essentially the bone that connects with the lateral cartilage it also defines the shape of the nose and consists of 2 oblong shapes connected together. The Nasal aperture is the pear shaped hole that acts as the inlet for the nose, it is made up of the nasal bones and the maxillary bones. And finally the anterior nasal spine this affects the columella-labial angle and is connected to the lower margin of the nasal aperture.

For the last task, I simply labelled the basic parts of the human nose; the alar cartilage, lateral cartilage, septum cartilage, nasal bones, alar fat, septum, philtrum and the columellar-labial angle, all of which have been colour coded to identify the parts of the nose shown on the left side. This image was also used to help me create the three nose sculptures I made above and has provided me a general idea of what the basic parts look like and what the overall shape of the human nose will look once all sculptures have been made.


Here are some George Bridgman illustrations that I also found very useful in helping me with crafting the nose, these were used as the overall reference guide for me to sculpt every nose I made, I have also used these images to identify the cartilages of the nose.
Week 3 - Sculpting 3 Mouths
For week 3 I have sculpted 3 lips, however unlike last week, all noses have reference images, this task I have used only two for the second and third mouths, the first one I made completely from scratch. Just like the noses, I have used a multiple brushes to complete the mouths and to make it as realistic as possible, brushes like dam standard (BDS) was primarily used as well as the smooth tool (shift + any brush). I have also used ClayBuildup (BCB) to add some creases/wrinkles to the lips. Like the previous nose sculptures, I have provided videos on creating them as well.
Mouth 1


Mouth 2


Mouth 3 (Final Sculpture)


Development stages: first sculpture

As for the First mouth sculpture, I decided to have no reference image to work on and simply used my imagination. Since this mouth was made using pure thought, I little grasp on the basic appearance of the human mouth. As pointed out on the image opposite, the vermillion border of the mouth on the upper lip is too sharp and too defined, without reference images, it can be quite difficult to get an idea of this part is supposed to look like. However, with the second sculpture, I decided to use Lewis Hamilton as a reference image, but this doesn't come without it's fair share of problems.
Development stages: second sculpture


Instead of rushing through the sculpture unlike the previous one, the second proved to be not only improved the overall look of the mouth, but also proved to be much easier to work with now that I have a reference image to work with. Using Lewis Hamilton, I sculpted it to look as accurately as possible, I smoothened out the vermillion borders, as well as digging much deeper on the gap between the upper and lower lip to give a more accurate representation. Although, there is one small problem with the upper and lower lips. The human anatomy is far from perfect, some parts of the face and even the whole body overlap one another, and as pointed out from the images above, the upper lip is not overlapping the lower lip, which is the case for most human mouths, I took another careful look at reference image again and it seems that the lower lip is slightly tucked underneath the upper lip - I addressed this issue with the final sculpture using Tom Hardy as a reference.
Development stages: third and final sculpture

Using Tom Hardy's image as a reference I finally addressed the lack of overlapping between the upper and lips. I also took note of the first mistake I made from the first sculpture; to use a reference image as well as adjusting any unrealistic detail on every part of the mouth i.e. very sharp vermillion borders. Although this sculpture is up to standard, it is far from perfect, I have added wrinkles/creases on both upper and lower lip using dam standard and claybuildup, it lacks any definition. I plan to improve these in the near future. I have uploaded the final model of this mouth onto sketchfab and is presented below.
Additional research...


For this research, I recently found out that the mouth is made out of different parts, the lower lip is made from two parts, whilst the upper lip is is made out of three parts, all of which fuse together. Once the lip is fully develop this leaves the philtrum above the upper lip and below the nose's septum. The tissue in between the two parts of the upper lip is called the tubercle and it is what connects the two parts together, the two sides form a cupid's bow. Another fact about the philtrum is that in some cases, the two parts of the upper lip did not fuse together properly during development, this is called cleft palate. in less severe cases, it is called microform cleft, this is noticeable on people like Joaquin Phoenix. The other parts of the lip are called the oral commissures which is essentially the corner of the mouth where the superior labium vermillion border meets the inferior vermillion border, and then of course, we come to the vermillion borders both superior which is the upper border and the inferior which is the lower border, this part is where lipstick is mainly applied.


For this next of the research, I went through the muscles of the mouth which also includes the chin. Firstly, I started off with the obicularis oris, this muscle surrounds the entire orbit of the mouth and it is the most complex. this is because the buccinator, the depressor anguli, nodes, pillars and the chin is all connected to it - all will be covered next. The buccinator is a flat thin muscle that helps with chewing as well as puckering and smiling. The depressor anguli quite like the opposite of the buccinator; it is essentially the "frowning muscle". The nodes (aka modoiolus) has multiple muscles attached to it, and it helps with pulling a facial expression, when smiling and frowning, most of the changes occur within the nodes. The pillars, or the depressor labii inferioris is the two muscles that angle inward forming a "W" shape on the bottom of the mouth and finally the mentalis or the chin. The Chin is made out of several parts, the mentolabial sulcus, which is the dent between the pillars, the mentolabial crease, is essentially the crease above the protrubenerance and lastly, the mentolabial protruberance itself which makes up the sharpness of the chin as well as the mentolabial angle.

The human mouth also involves the teeth, these include the medial incisors, lateral incisors, canines and the molars, both are located on the upper part of the skull and the jaw. The upper incisors are much bigger than the lower incisors by a quarter, the canines goes halfway into the mouth which leads to the back where the molars are placed. When a person smiles, it ususally opens up until the canines a showing, the molars can only be seen when the mouth is wide open. The overall shape of the mouth is cylindrical and not flat on the face, the mouth curved and wraps around the teeth, for example, when biting into an apple, the shape of the bite is curved and round not straight and flat!


For the final task I simply labelled the anatomy of the mouth region. As seen on the image above, the mouth consists of different parts, the philtrum, the node, marionette lines, nasolabial furrow, vermillion borders; both superior and inferior, mouth pillars, mental crease (the crease above the chin), the mental protuberance and the oribicularis oris. These are the basic parts that make up the human mouth, all these parts were more than useful in helping me sculpt the mouths I made for this week. However, with time and a lot more practice, I plan to improve as well as learn more useful skills and techniques in creating a very detailed and more refined human mouth.


Once again, I used Bridgman illustrations as overall reference for my work, it has helped me identify how the basic appearance and the shape of the lips as well as the whole mouth is supposed when sculpting the mouths.
Week 3 - Sculpting 3 ears
For this week, I have sculpted three human ears, this was one of the most difficult facial elements to sculpt - it was both time consuming as well as very detailed. I primarily had difficulties with the first and second ear, but once I grasped it, it was becoming less difficult to create. The main brushes I used for this task was the standard brush (BST) and the move brush (BMV), however I did apply some other tools as well such the dam standard (BDS) to create gaps between the helix, I also pressed the "alt" key for the same brush to expand on some of cartilage.
Ear 1


Ear 2


Ear 3 (Final sculpture)


The end results...
The ears were one of the more complex parts to create for the human face, especially when it comes to the helix and antihelix region - I had a difficult time to create these areas before they could be perfected. These sculptures were far from perfect, I am happy with the final result of the third and last ear model, although, they could use some improvements which I will be pointing out now. I also used references images for every sculpture as it proved to be quite difficult using without one!
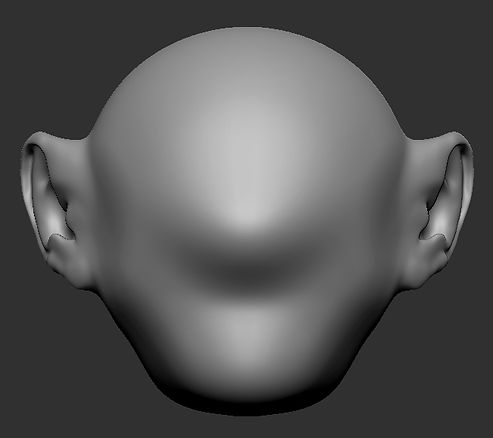

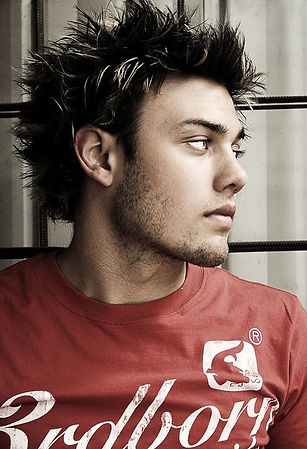
It was the first ear sculpture, I used Chris Pine as a reference. At first, it was quite difficult because, the angle of the ear on this image was hard to work with, so I had to use my imagination to recreate a proper look for the ear. The second sculpture, was slightly easier to create than the last, however this was as equally difficult to make., especially when creating the helix as well as the curvature of the ear. With the tools at hand, I made do with the final result. And finally the last ear, this one was less difficult to create as I had some time to practice with the other two ears, however I will point out the two improvements that I should've made. Firstly the tragus, this part was way too thin to represent a realistic shape, it is very noticeable when looking at it from the side. And secondly, the top of the ear, there should be a between the head and where the ear is connected, but overall I am happy with the final result.

Overall, I am content with the final result of the ears, especially the last one, I tried to recreate it as accurately as possible, but it still could use some more improvements in the future. For now, I have uploaded this sculpture to sketchfab and will be presented below...
Additional research...

For my additional research, I will be discussing the basic parts as well as functions of the human ear. Firstly, I will be covering the auricle, this is also known as the pinna, it is the most visible part of the ear and it is made entirely out of cartilage covered by a tight fitting skin. There are different parts to the outer ear, and they are the helix regions, the tragus - which are made out of cartilage, the lobe which is the only part of the pinna that isn't made out of cartilage but flesh, differ on human beings, some are free hanging, while others are small and are attached to the head. Finally the concha, which is the the depression on the external ear that leads to the meatus which the ear hole. The ear has muscles attached to it which is also connected to the skull and the scalp. The muscles within the ear have no function, however, in some people there is very little or limited movement they can do, this is covered more in depth on human vestigiality below...


For the second ear sculpture I did, I tried to imitate human vestigiality, although the second reference image lacks it. Through evolution, humans were able to move their ears but has since lost them, this is similar to primates as seen here by the image of a rhesus monkey. These monkeys are able to move them to hear any potential threats around them, essentially they can hear behind as well as their surroundings much more clearly than humans. However unlike monkeys, they cannot move their heads on a much like humans do, we make up for the loss of a vestigial ear for a head that can turn on a horizontal plane.


This very common for MMA fighters, boxers and rugby players, the cauliflower ear is a condition when the ear is struck by a blow causing fluid to build up within the perichondrium portion of the ear, the perichondrium is the connective tissue that surrounds the cartilage, it also helps with the growth as well as repairing of the ear when damaged. When the ear suffers a strike, the perichondrium is separated from the cartilage, the nutrients that supplies it is also cut off which causes it do die and forming a fibrous tissue within the ear. The damage is irreversible, leaving it permanently scarred and deformed that resembles a cauliflower.

For the final task of the week, I simply just labelled the basic parts of the human ear - they are as follows: the helix, the antihelix superior crus, inferior crus, triangular fossa, the tragus, antitragus, the lobe, scaphoid fossa and the intertragic notch. The sculpting of the ear had its fair shaire of difficulties, I mainly had troubles with the antihelix region of the ear - that includes both superior and inferior crus as well as the scaphoid fossa. Although they were difficult, with time and a lot more practice, I became accustomed to sculpting the human ear. Like the previous tasks for the mouth and the nose, using this image has helped me not only identify the basic anatomy of the human ear and has helped me to sculpt it altogether.


Another reference I used to make the ears, just like before, these are George Bridgman illustrations and used them as the overall guidance in identifying the outer ear as well as the general idea of the ear's appearance.
Week 4 & 5 - Sculpting 3 eyes
For this week, we sculpted 3 eyes, all of this is a work in progress as eyes is still a work in progress as this week is a part 1 of the lecture, we still intend to further progress and hone our skills in sculpting the eye, however here are some sculptures of 3 eyes I have made, I plan to improve these in the future. Instead of the regular standard brush, I mainly used Clay Build up (BCU), and dam standard (BDS) to create the texturing. Below are the images/screenshots of the three eyes I made using references, I have taken the liberty of also recording the steps taken to sculpt each model.
Eyes 1


Eyes 2


Eyes 3 (Final sculpture)


Improvements needed...


To start this section, I will be describing the mistakes I have made when sculpting the eyes. The first eye proved to be quite difficult to make, as it requires appending multiple spheres and duplicating them to create the eyelids, the eyeball (which was added after) and the overall area surrounding it. one particular mistake I made when creating the eye is using one single reference image, looking at the eye at a single angle is very difficult, this is evident from the first eye, the eyeball appears to be "sticking out" too much, giving the idea it is about to "pop out!" One of the other mistakes I made is the eyelids, it appears to be too thin on both the first and second models. Again, this is due to the fact that using a reference from a single angle can be difficult to work with.


Although I am happy with the end result of the final sculpture, there are still some improvements that needed to be made. Using Clint Eastwood as a reference, I have sculpted his left eye using a variety of tools. Instead of the usual standard brush to create the eye, I simply used the ClayBuildup, this brush served to be very useful when texture the overall look and realism of the eye models. One criticism I have of the final sculpture is that the medial canthal tendon is too sharp instead of blending and smoothening it, I simply left it as it is. In the near future, I will be improving the overall look of this model. Another one I should've improved is the wrinkles around the eyes, instead of using the the ClayBuildup alternative, I should've Dam standard wil the intensity set to low as well as the brush size. Below is the final rendition of the Clint Eastwood's left eye on Sketchfab.

Additional research...

For the additional research, this section will be covering the tarsal plates (upper and lower), the canthal tendon and the orbit. The tarsal plates are a fibrous tissue and it is the only part around the eye where the wrinkles stop. The tarsal plates follow the eyeball as it follows though the canthal tendon. These tendons hold the tarsal plates in place and they are connected to the orbit i.e. the skull, this is also where the infraorbital furrow is located. Another fact about the tarsal plates is when the eyelids are closed, the lower tarsal plate rolls under the skin. Again, when the eyes are closed, there is usually folds on the upper eyelid.

Another addition to the research is the canthus and the canthal tilt of the eye. There are two side of the canthus within the eye: the medial and the lateral canthus, these are tilted and this is called the canthal tilt. Every tilt is unique in every person, when the lateral canthus is higher than the medial tilt, it is a positive canthal tilt, when it is the other way around it is a negative canthal tilt and when it is aligned it is a neutral canthal tilt. Males tend to have a slight positive canthal tilt than females, usually the medial canthus is lower than the lateral by 2mm and females have it 4mm lower.


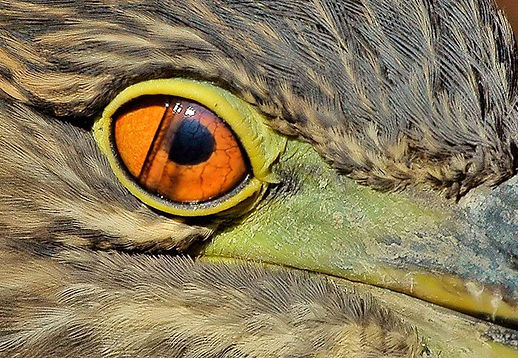
Lastly, the smaller parts of the eye, these include the caruncula, conjunctiva, lacrimal punctum, and the plica semilunaris. Firstly the caruncula, this is the pink nodule next to the medial canthus of the eye it is made entirely out of sweat glands and skin covering sebaceous. Next is the conjunctiva, this is the thin membrane that covers the front of the eye the surface of the eyelids, when people get infected here it is called conjunctivitis which is also known as "pink eye". The lacrimal punctum acts as a drainage system for the eyes, this is where fluid is secreted to lubricate the eye, also this where tears are released. and finally the plica semilunaris. Much like the vestigiality (see ear additional research), us humans have evolved out of this, the plica semilunaris, also known as the nictating membrane is essentially a third eyelid, animals such as birds, cats and other reptiles have these eyelid features.

Here are the basic parts of the eye, like previous images of the facial anatomy, this has help me with sculpting and identify which parts to sculpt. The labelled parts include the medial canthus, lateral canthus, palpebral fissure both length and height, interpupilary distance, both superior and inferior palpebral crease, infraorbital furrow, caruncle. I found the eyes much easier than the ears, although it is complex there are some improvements that need to be made such as the caruncle area, I plan to improve these eyes to be as realistic as possible.


Once again, George Bridgman illustrations have helped me sculpt the eyes and used as the overall reference, I will be using these images for any ZBrush sculpting projects in the near future...

The Villain - The Mad Scientist

For this task I will be sculpting a Mad Scientist. Most commonly found in fiction, a mad scientist or professor, usually have very unsettling personality traits i.e. psychotic/ sociopathic and narcissistic or egomaniacal. It's not just their personality that gives them their identity but also their nature of work. Mad scientists usually rely on their experiments and craft to seek world domination, vengeance, altering the surface of the universe and even human experimentation. Some of them like to "play God" and some have pure intentions - an experiment gone horribly wrong which can inevitably make them in an accidental villain.
Some mad scientists in works of fiction aren't usually antagonistic (like Doc Brown from Back to the Future), but in this case, I will be sculpting a villainous professor; an outcast to society and who has isolated himself from the rest of the world to dedicate his whole life in seeking the perfect weapon to reek his so-called vengeance upon the world! He has spent his entire life making this "weapon" and claims that can alter the surface of the universe.


As you can see from the mood board above, I have taken some pictures of notable "mad scientists" both from fiction and non-fiction, some may not even be profeossors/scientists but yields the trait of a narcissist as well as their overall physical appearance (Count Olaf from A Series of Unfortunate Events). Also, some aren't actually villainous as well! What I found interesting is that there actual mad scientists in real life, take Nikola Tesla, for example. Tesla had an obsessive compulsive disorder and has become overly obsessed with the number "3" as well as touching human hair, he also happened to have "fallen in love" with a pigeon! Which, obviously, is very unsettling for other people. In fact, Nikola Tesla was one of the foundations in creating the whole "mad scientist" trait in fiction, you could even say he was the first mad scientist...
The images shown on the mood board is what the overall look I'm going for when sculpting the mad scientist, they usually wear goggles/glasses, both fair looking and fuzzy hair (although, I will be going for the grey, fuzzy look) as well as an unkempt beard.
Sculpting the Villain - Part 1


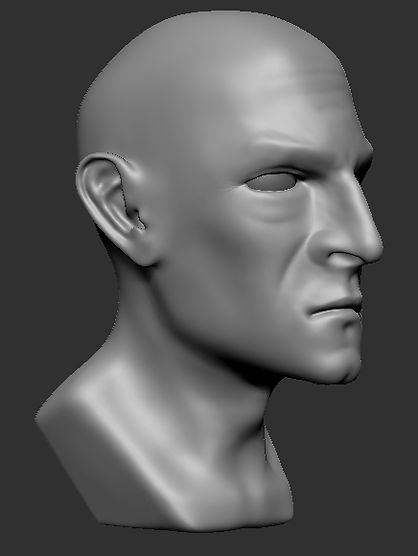
For the first part of my sculpture, I will try to make the villain a sinister look, emaciated (almost skeletal looking), and particularly thin looking. He will also be old, therefore he'll have wrinkles around at the eyes, cheeks, mouth etc. As for the clothes, he will have a lab coat or trench coat with a standing collar, other miscellaneous equipment will be a tie or a bow as well as wraparound goggles placed on his head or even small thin glasses with a metal frame. For now, here is the foundation of my villain, I will be moving on to the ears next as well as the eyes, I will be adding the wrinkles next. In addition, using Christopher Lloyd's character in Back to the Future, Gene Wilder in Dr. Frankenstein and Count Olaf from A Series pf Unfortunate Events, although the first two are not the villainous type and latter not even a mad scientist, they have the overall look I am looking for. As for the hair, I will also be adding last.
Goggle Ideas...


The Goggles are one of the key features (as well as the unkempt, "crazy" hair) for the mad scientist, I gathered some images from the internet, from modern welding goggles to old, Victorian and steampunk styled goggles. The original concept was to create a steampunk goggles with additional lenses, protruding springs, spikes and steel/copper wiring as well as electrical surges surrounding it, this however may stray away from my final concept, of a "modern" mad scientist even though one of the inspirations for the villain is Nikola Tesla, a prominent scientist from late 19th century .
Lab coat/Trench Coat Ideas...

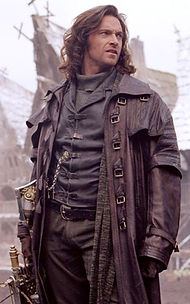


The lab coats I'm looking for a mixture of western duster coats, WWI styled trench coats, steampunk inspired labcoat/duster coats as well as modern overcoats and 19th century/Victorian styled labcoats. All these have the same general idea of what I'm looking for, a collar that can be stood up, material made out of leather as well as wool/cloth. My first concept originally had a hood attached to it however, much like the steampunk goggles, it strayed too far from the final design, I made a decision and stuck with a either a generic white labcoat with a collar standing up as well as a dark black/navy, turtleneck sweater (turtleneck similar to Hugh Jackman's character aka Van Helsing on the mood board above).
Sculpting the Villain - Part 2
For the second stage of the sculpture, I have now applied the wrinkles and the overall roughness of the face, as presented by the pictures below, there are some creases present on the Mad Scientist's forehead. Below the eyes, there are now eye bags directly located below the palpebral crease, they are "sagging" and dropping which resembles an old person. I have also added crow's feet on the eyes. Other than the wrinkles, I have also given improvements to the nose, the alar fat has a crease and gave a further detail and placed the nostrils. I have also placed the eyeballs, added the caruncla and defined the mental protuberance and crease much further. I have also taken the liberty of placing a mental cleft on the middle of the chin to keep things interesting.
Other minor improvements was defining the brow as well, I tried to place a wrinkled between the inner brow, resembling a permanent scowling look, the eyebrows are also pointing inwards also giving an angry, sinister look. For the next part, I will define the neck much further. The changes made will be shown by the picture below...
Adjusting mental protuberance and adding cleft


Refining alar fat crease, alar cartilage and nasal labial fold...


Crow's feet, eyebags and forehead creases...


The Villain so far...


Since the neck, shoulders, back (protrusion of the spine) and other facial feature have been adjusted, I am now in the process of creating clothing for the mad scientist. I will go with my current plan of a giving it a simple turtleneck, which I will colour dark grey and a lab coat with a standing collar, which I will colour an off-white texture. After this process has been done, I will now be moving on to the final stages of the project, which of course will be adding the hair and adding some colour to the skin, once finished I will be assessing the sculpture's appearance and see if more detail needs to calibrated or added.
Sculpting the Villain - Part 3
For this stage of the sculpting process, the villain is finally taking its final form, there has been DEVELOPMENTAL CHANGES for this sculpture, the changes being the hair and the lab coat/trench coat for the villain. The Mad Scientist now sports a turtleneck that will be coloured white as well as a slicked back hair, I stayed true to some forms of it's design i.e. his receding hairline and turtleneck shirt/sweater. The hair was one of the simplest details on the sculpture, all it took was a ClayBuildup brush (BCB) to texture the villain's hair, I used brush symmetry to quickly sculpt the hair, although it is immersion breaking as the hair design is symmetrical, I will continue the process of fixing this later on the sculpture.
Apart from the obvious changes, I planned for the villain to have thick eyebrows with a permanent sinister look to him as well as mutton chops. I chose this type of facial hair due to the level of design for his chin, covering with a beard will simply ruin the look I was going for. Below are the images for the changes and the current stage of the Mad Scientist...
Front, rear, top and side view...


As seen on the images above, the images are symmetrical as opposed to asymmetrical. This causes some issue in terms of realism, I intend to fix this later on by pressing "X" on the keyboard will turn off brush symmetry. I brushed the hair using ClayBuildup (BCB) and by following the shape of the hair, I brushed from front back and starting directly above the forehead for the receding hairline/balding effect. After applying the hair, I then brushed some facial hair i.e. the mutton chops, using "cris-cross" strokes, I was able to create a realistic textured hair, the next the hair texturing was the eyebrows, this was applied by pulling away from the bridge of nose, I was then able to create the appropriate eyebrow look I was going for.
Accessories, clothing and other changes.
When I first came up with the concept of the villain, one of the main looks it gives a "Bond villain", a menacing and sinister appearance, so I thought it'd be appropriate that he look the part with a specific wardrobe in mind. Below are certain Bond Villains I have found on the internet...


}
.jpg)
As you can see here, they have more or less the same appearance, especially with Dr. No (bottom right corner), they all sport a turtleneck as well as giving an overall menacing appearance. I am now going to show the process of making the turtle neck and accessories for the villain.


First, I carefully masked the sculpture's bottom area as well as the neck for the sweater, I made sure that symmetry is on and the mask is carefully wrapped around the neck, if not then the turtleneck's shape will come out uneven. After that's done, I then navigated to the tool's side (on the right), on the subtool section, I scrolled down to Extract. from here I adjusted the thickness to 0.1 and finally I pressed extract, by doing this, I have now created a new and sperate subtool. from here, I started smoothening the texture of the sweater to remove and bony and neck details left out previously, I then used a variety of tools i.e. move (BMV) and polish (BHP) to carefully texture the attire. Below is the process of making and importing the goggles from Maya to ZBrush
Smoothening

EP Curve Tool

Adding Extrusions


As for the goggles, I simply created this one from Maya and imported the mesh onto ZBrush. This was one of the more simpler methods of creating the accessory. I opened up Maya and placed a cylinder poly, from there, I added to extra corners and extruded it inwards. After that process, I duplicated the cylinder and added a cube poly and reshaped it to act as the connector for the goggles. The more tedious process for this part was the wrap-around strap which included using a cube poly and the EP Curve tool. First, I drew the lines via EP Curve, I made sure it goes INSIDE the the two cylinders, otherwise it detach when imported into ZBrush. Once the curve was drawn, I applied another cube poly and reshaped it appropriately, I placed it where I originally applied the start of the curve and at the attribute editor, I finally added the extrusions which is set to maximum (25). I also smoothen all the polys; mesh > smooth.
I then imported it into ZBrush, but first I exported the goggles as an OBJ within Maya and from ZBrush appended a new tool and simply imported the newly created goggles, it will appear large which I then simply resized and placed on the Mad Scientist's forehead. Below is the villain in its current stage.
The Mad Scientist taking shape...


Sculpting the Villain - Part 4: Finishing Touches
And so, the villain sculpture is finally reaching its end stages, for the final part, I will be painting the sculpture the appropriate colours that suits well for the overall appearance as well as the recording the Action Units in order to form the facial expressions/dynamic poses. But before I do the action units the character must be painted so I can capture the full effect make The Mad Scientist come to life! the colour I will be choosing will be a pale-white for the skin colour, an off-grey for the side of the head and the front highlights, and a dark brown as well as a really small highlight of regular brown for the top and back of the head, the brow will only be coloured dark brown. The sclera will be coloured white, the iris will be blue and of course the pupils black. As for the accessories and clothing the turtleneck is coloured a slight off-white, the goggles will also be painted a variety of colours, for the lenses, I will be colouring it a bright shade of red, the frame I thought would be appropriate for it to match the turtleneck so I went for a bright white paint, and the straps a a slightly dark grey.
Below are images and methods demonstrating my painting process of the skin which involves the 3 COLOUR REGIONS of the face...

The image opposite is a screen capture of the villain using a skin shade texture, this will capture the skin-like colour I am going for, however I need to apply the appropriate colour but before that I will be painting the brow, cheek and chin area yellow, red and blue respectively. This may look odd at first but the skin colour is applied, this will start to look much natural. the reason why yellow, red and blue colour was chosen was because the top region has very limited source of blood flow as well as muscles, the middle region of the face has more capillaries where oxygenated blood is located and the bottom part of the face has a light stubble which is more prominent for men than women. This area is where the deoxygenated is located as well.
Once all this has been placed the skin will be layered above the three colours, I set the RGB intensity to 5, once the layer of skin colour paint has been applied the natural look will finally start to appear.
The skin, hair and eyebrow colour applied...


The pictures above are exported from Zbrush, the model itself now looks how I expected it to look, I felt that it was appropriate to point out some factors for this colour; specifically the hair and mutton chops could've been done better, the hair looks slightly unnatural when looking closer, almost gives out a "cartoon-ish" look, however, the eyebrows was done much carefully, the colour looks more natural when looking at certain points of view.
Finally, as seen by this last image on the left, I have also taken the liberty of adding some stubble, by changing the turning "Zadd" back on and turning "RGB" off. I then changed the strokes from Dots to Spray and finally the alpha to "alpha07", I decrease the brush size (this is because the smaller the brush the smaller the texture will be) and applied the stubble by pressing the alt key to brush the bottom part of the face to create the stubble, I have also added some pores on the nose with the same brush effect.
Eyes, accessory and clothing coloured in...


The eyes, goggles and the turtleneck were the finishing touches to the sculpture, I first coloured the eyes a light blue colour, using only the standard freehand stroke with alpha off, I adjusted the focal shift "-100" this will create a circle with a single press, this was done both for the iris and the pupil, I then switched to the move brush (BMV) and pulled the iris out slightly. as for the turtleneck, I just simply filled the overall texture an off-white colour. Finally the goggles was painted on carefully using the freehand stroke with alpha set off, I began colouring the lenses a bright red and painted the frame and wrap white and slightly dark grey respectively. I thought red lenses on the goggles would look menacing when the Mad Scientist wears them!
The End Result...


This is the final outcome of the model, and I couldn't have been more satisfied with the result, the overall look I was going for was achieved and the Mad Scientist has finally been brought to life! although it could use some further improvements, for example the eyes and the overall eye colour, using available software i.e. Maya, I could have made a much more realistic eye colour, this will further improve my sculpture and bring more life to it's appearance, another area that could see improving was the hair, the looks slightly "cartoon-ish" in appearance, I could use other tools to improve it's texture and colour, however, I did manage to fix the hair's symmetrical look, by pressing "x" to turn off brush symmetry.
With the finishing touches complete, I am now able to dynamically pose the Mad Scientist's facial expressions using Action Units. The images can be seen below...
FACS: Action Units and dynamic posing/facial expressions
Finally I will be implementing the FACS for the Mad Scientist, FACS stands for Facial Animation Coding System and it is used for a variety of subjects whether it's scientific research and/or animation in general. According to Dr Paul Ekman, there are SEVEN MAIN universal expressions a human has, they are Fear, Anger, Disgust, Sadness, Contempt, Surprise and Enjoyment, each of these expressions can be made up using Action Units (AU). The Action Unit System covers the movements a face makes as well as the key expressions mentioned previously, each action unit can be combined to create expression or a variation of it. There are 24 primary AUs that can be implemented to a character, in this case, I will be applying the AU system onto the Mad Scientist, I will be presenting the NEUTRAL against the EXPRESSIONS as a reference that each and every one is unique and not one is the same. The expressions I will be presenting will be Enjoyment, Contempt, Fear, and Disgust. There will also be a variation of the Enjoyment expression; a "Sinister Smile" (because I thought it'd be appropriate for this character!) All six screenshots will be presented below.


Neutral Expression

Enjoyment: AU1(Inner Brow Raiser) + AU5 (Upper Lid Raiser) + AU12 (Lip Corner Puller) + AU13 (Cheek Puffer)

Enjoyment (the "Sinister Smile"): AU2 (Outer Brow Raiser) + AU4 (Brow Lowerer) + AU7 (Lid Tightener) + AU12 (Lip Corner Puller) +AU13 (Cheek Puffer)

Contempt: AU4 (Brow Lowerer) + AU10 (Upper Lip Raiser) + AU13 (Cheek Puffer)

Fear: AU1 (Inner Brow Raiser) + AU5 (Upper Lid Raiser) + AU15 (Lip Corner Depressor)
