Spaceship (Maya)
This Spaceship was created using Maya. First, I created a cube and selected the Channel Box panel of the the cube model, I then clicked on how many subdivisions I needed; Width and depth to 3. I then right clicked and hold to make a face selection, this will allow me to edit the each individual face of the subdivisions, I then shift + click on the faces I needed and then select the scale tool as well as shift + drag to extrude the faces to a certain length. I then pressed 2 on the keyboard to view the smoothed display of the model. I also added the chrome texture on the model by right click and hold then going to object mode, assign new material > arnold > shader > aiStandardSurface. On the attribute editor tab of the object, I selected preset and select chrome to retexture the model to chrome when viewed in render mode

Green Screen (Photoshop)


For this activity, I used Photoshop and to apply the sky in the background. In order for me to do this task, I simply used the colour range tool to select the green screen background I used the eye dropper tool to select the green screen and selected invert. After that the picture of the lady will then be selected, and when layer mask is clicked, this will make the green screen background invisible and the sky becoming the background. In order for me to make the image cleaner, I then adjusted the saturation levels where the some parts of the lady's hair were still showing the green background. I set the saturaion levels to -100 to hide any green screen "traces". I saved the image as a PNG format.
Animal Hybrid (Photoshop)


Photoshop was also used for this activity. This is an animal hybrid which consists of three animals: Seal, Pig and an Orangutan. in order to for me to combine the three animals I used a series of tools such as the polygonal lasso tool to quickly select the orangutan's face, I then copy and pasted the selected face onto the pig's body, too add more realism to the picture, I used the eraser tool to smoothen the edges of the orangutan's face. once that is done I merged the layers by selecting both the pig and the face pressing ctrl + e. I cropped out the newly merged image's by using the lasso tool once more and copy and pasted again on to the seals body and used the eraser to smoothen the edges again. Once that was finished, I saved the image and converted the image to a PNG format.
Stonehenge (Photoshop)


This Photoshop image was created using a tool called Quick selection tool. First, I opened the dark, cloudy sky as a background, once that is done, I then opened the the Stonehenge image, this image however, has a bright blue sky, order for me to change the sky, I used the quick selection tool to select the blue sky, I pressed delete on the keyboard and once that was done, the blue sky will be now replaced with the darker and cloudy one, as seen on the third picture. I saved the and converted the image to a PNG.
Abandoned Building (Photoshop)
This is a Photoshopped image which consists of three images. First, the building itself, second the rust texture and lastly the dark sky. I have done this by first opening the building, I used the quick selection tool and then clicked the Add Vector mask, this will delete the bright blue sky and will create a layer of the building's outline. I then added the dark cloudy sky at this point. To add the rusty texture, I ctrl + click on the masked outline of the building and then clicked the rust layer and clicked Add Vector mask once more this will add a layer of rust on the building. I then adjusted opacity of the rust, so it exposes the building add ultimately adding a desolate and abandoned look on the building. I also added foliage on the building by using the brush tool and changed the brush tip to leaves, I also adjusted the scatter of the brush, placing the foliage on random spots on the building

Teapot (Maya)
This teapot was created in maya along with a series of tools and other techniques. First I created the body of the teapot by clicking on polygon cylinder. For the bottom of the teapot, I created an extra edge by shift + right click and select insert edge loop tool. I then scaled down to an appropriate size. For the spout and handle, I used the EP curve tool and extrude the face where the spine is place on the teapot. For the lighting I simply used Arnold's Area Light to create realistic lighting, I scaled and increased the size of the light to cover a wider area, I then went to the attribute editor tab of lighting, deselected normalise, increase the intensity and exposure to brighten the light. I rendered the model and results are shown on the picture to the right.

Fake News - Tiniest Koalas


For my assessment, I used my finger and photoshopped two Koalas climbing it. I used a variety of tools and techniques to make this possible, including smudge brush and Gaussian blur. I took a photo of my hand using my Samsung smartphone camera, as for the Koalas, I simply found on the internet along with the cave background as well as the desert. Below are the techniques and tools I used as well as the images used.


Smudge Tool
This tool was necessary to recreate and cropped out fur the Koalas had, the smudge tool can be found within the blur tool. I simply selected the edges of the koalas where thick fur is and pull away slightly from it to create furry/fuzzy texturing.


Gaussian Blur
This technique was used to create a blurred background, this implements an illusion of focus on the primary subjects i.e. the Koalas climbing the finger.
Drop Shadow
This was used to create realism and was applied to the koalas. As the name suggests, it adds a shadow to the koalas in order to make the fake news more believable and "real".


Hue and Hue Sliders
Creating a layer to adjust the hue will adjust the overall background and subjects altogether to create matching lighting and colour for a more realistic appearance.

Bond Gadget - Drone w/ Machine gun


Using Maya for this creation and using a series of tools and techniques, I was able to complete this project with all of them proving to be useful as shown in pictures opposite. This bond gadget features a drone with a machinegun on its underside, it also has a compartment for discreetly storing the weapon. Below is the list of tools and techniques used as well as reference images:

Extruding corners
for the base of the model, I started with a simple poly cube and bevelled it. with this, I am able to create four faces on each corner which I then extruded by pressing Shift + Left click and drag. by doing this I created pillars for the rotors


Boolean > Difference
for the machine gun, it requires a muzzle brake. Muzzles usually has holes, for this technique, I used boolean > difference to create "cutouts" on the shape, I used cylinders polys create the holes
Gun Compartment - Extrude
The machine gun also requires a compartment for it to be stored discreetly, I simply selected the underside face of the drone and extruded inwards rather than outwards, this creates a space for the gun.


Machine gun Belt - Bezier Curve
The machine gun also has a belt attached to magazine/ammunition box, to draw the the belt, I used the bezier curve tool to create the spine so I can extrude the face to the appropriate length.
Extruding along a spine
For me to create the gun belt, I need to extrude the face where the ammunition is being fed towards the top where the magazine/ammo box is located. The white line opposite the face is the spine drawn using the bezier curve tool, once they are all together I can increase number divisions to lengthen the belt


Rotor - Smooth edges
For the rotor, I simply used a pipe poly shape to create the compartment for the propellers. Whereas for this component, I used five different parts; cube polys shaped into a triangle which have been duplicated 3 more times and a single cylinder reduced in size. I then pressed 3 on the keyboard to smoothen out the edges to create a realistic depiction.
Arnold Texture - aiStandardSurface
As for the finishing touches, I implemented an Arnold texture onto the model, using metallic car paint I thought would be appropriate for the gadget. I right clicked and selected object mode on the model and assigned new material.


NYC Rooftops

For this project, I have created several buildings using basic poly shapes and conventional texturing methods; UV mapping as well as Hypershade. I also created assets such as air vents, air conditioning units and several water towers. These assets serve a purpose; to make the rooftops stand out. Below are the several methods used to create the rooftops. Reference images will also be shown below


Windows - Basic Shape

In order to create the windows for the building I started off with a simple polygon plane and added subdivisions to create a window frame.
I then selected the outer edge of the model and expanded it to make space for UV mapping a brick wall texture to be applied onto it


By pressing ctrl + e or Edit mesh > Extrude, I was able to create a window frame. I selected the window faces and turned off "keep faces together" and simply decease the size of of the faces, this creates the frame which is also UV mapped later on.

Final outcome
Windows - UV Mapping


To UV Map the window, I selected the model and go to UV > UV Editor. This unfolds the shape and shows where the texture can be applied. To resize the UV, I right click and hold and select the UV shell.

After I've done resizing the UV down to its appropriate size, I saved a snapshot in order for the texture to be applied to Photoshop. Photoshop will be used to apply the brick wall texture as well as the frame.
Once opened in Photoshop, the snapshot will look something like this. Outlines of the UV will be shown, this will represent where the textures will be placed.


These are the two main textures that I used to texture the wall and the window frame respectively.

I covered the UV shell with the textures provided and then saved this as a TIFF file. Returning to Maya, I then applied the texture to the window by assigning a new material.


Clicking on the checkered box (Create render node) on the right hand side will open this window, by clicking on file and uploading the appropriate photoshopped image, this will apply the texture onto the window.

Final outcome
Assets used


the Assets include a Water tower, Chimney, AC unit with vents, an air vent and two other miscellaneous rooftop details. All have been textured using UV Editing with the exception of the vents on the AC unit; it uses an Arnold texture car metal paint.
Time Leap - 50s service station


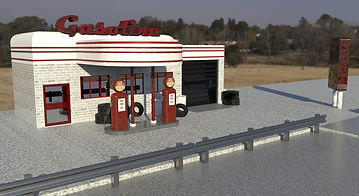
For my time leap I decided to go with a 50's rendition of service/gas station. Using a colours such as red and white to give it classic retro look back in the 50's. This model was more complex to create but less time consuming than the NYC rooftops. I also used similar tools and techniques for this model; they will all be shown below as well as the reference images.

This was the overall shape I captured for the service station, rounded rooftop uses bevelling, as well as an extruded rooftop to cover the gas pumps. The right-hand side of the gas station is also extruded to create a garage. The majority of the textures used is done using hypershade with the exception of the wall which is UV mapped with a photoshopped brick wall. The Pillars that support the rooftop along with the platform below it were separate polygon pieces.


This was brick wall was reused from the NYC rooftop, but it was recoloured white to match the overall white and red style of the station.

For the windows and doors, I simply did Boolean > Difference once again, this will create a space between the windows and the service station itself.
As aforementioned, the texturing technique that I used for the model was Hypershade. I recreated a rusty look for the gas station and a majority of its assets, by applying a volume noise texture an assigning the Out Alpha to the Specular roughness, this will create a rusty, worn-out texture.


This is the gas pump without its texture, it also UV mapped on the logo and the meters, the overall model was textured using hypershade. Below are the images (found on the internet) used to texture parts of the gas pump


Here are the assets used to give detail to the service station and to make it stand out more. Assets include steel barrels, large and small tires respectively. Hypershade was used to texture these assets as well.


I also used text on my service station, I went to the Create Tab > type and applied a retro styled font sign on the rooftop of the station. On the attribute editor, this is where I changed the font style and what the text says. I can also change the font sizes to appropriately fit onto the model.


This Sign was created using a variety of poly shapes, including cube poly and cylinders. Like the most of the assets, it was textured using Hypershade apart from its face which was UV mapped with the image opposite