Realtime Assets and 3D Creation
Lecture Screenshots
Sculpting Landscapes


During the lesson we were learning to create terrain. To further grasp some knowledge of this I started by adding a planar, as seen on the viewport, by using the sculpt tool, I was able to then create some hill sides and landscapes, this proved to be a useful feature which I have implemented onto my game in the future. Different sculpting tools were used, mainly I used distortion and smooth. I made some adjustments to the sliders to increase and decrease the tool's intensity.
I then implemented some colour onto it. I started by connecting colour nodes of the grass (green), rock (grey) and white (snow) to a layer blend which I then dragged the node to connect to the LandMaterial's Base colour. Now, I was able to colour the terrain with whichever colour I chose.
To further add to the realism, I added some grass which I pulled from the content displayer and placed under the paint section. This way, I was able to "paint" some grass onto the landscape.
Animating platforms


For the next session, I have created a platform that moves. When stepped on, it will start to move in the direction represented by the blue line as shown on the viewport. I Applied a box trigger and placed it on top of the platform. After that, I opened the Level Blueprint to apply the scripting needed for the trigger box to make it move.
To animate it, I opened the sequencer; the Transform tab to open the will add the keys for each second the platform moves it represented by 30 frames = 1 second, the platform will move for approximately 4 seconds therefore it halts at 120 frames.
I was far from finished with this example; I would then make the platform play in reverse when the platform reaches its final frame. To do this, I went back to the Level Blueprint and placed reverse. The animation will also loop so it will also be connected to a loop sequence connected to the delay of the platform. The delay will also last for 4 seconds.
Game ScreenShots
One of the basic necessities for a game is animating. In this case I animated a gate to open when the player character goes near it. The gate is an asset I made; I applied the textures myself using what was available within the content folder.
In order for the gate to open, the player character must go near it or to come in physical contact with it. Therefore, implemented a Trigger Box that surrounds both gates. Once the player has walks through the trigger box, the two gates will open.
The trigger box is rather pointless if the gate has not been animated to open, so the method I used for this is using Matinees. The matinees are indicated by a clapperboard which can be moved around the game world, in this case I placed them above the corresponding actors
Before I animated, I moved the select tool to the bottom left and right side of the gates respectively to create a pivot. This way, I was able to animated through an arch. Using key frames to add a starting and finishing point for the animation, I animated the gate to open in 1 second.
Animating with Matinees


Audio (Foot steps and other SFX)


Without audio, games would remain dull and lifeless, therefore, I applied sound effects to certain actors within my game, in this case footsteps. Before I began the process, I downloaded a footstep sound effect via a third-party website. Using a free software called Audacity, I was to export the audio file as a WAV.
Now that this process has been completed, I opened the folder where the WAV file was located, I dragged and dropped the file onto the content section, made a new folder called “Sounds” with a subfolder named “Footsteps”, where a then placed the new files.
Within that subfolder, I created an Audio Cue, this will allow me to implement sound effects to any actors that require an action. By double clicking on the audio cue, it opens a blueprint that contains the audio’s output; this will not create sound yet. To do just that I dragged and drop the necessary audio file that I need onto the blueprint which I then connected a node onto the output.
This is not the end of the process however as I still need to add the audio to the actor. To do that I opened the character’s animation sequence for walk and run. Double clicking on the animation sequence will open the animation preview. To finally add the audio, on the notifies section of the animation I right clicked, added a new notify and then play sound. This will place a notify on the specified time the sound will play during the animation; I moved the notifies so it plays in sync with the character.
Another process that required matinees are cutscenes, this makes gameplay much more interesting for the players. To start the process off, I clicked on cinematics on the upper tab and added a new matinee. This will open the matinee window, on the left-hand side of the sequencer, I then right clicked and added a new camera group which a I named “Cutscene1”.
I then clicked on the movement track, right clicked, and added a new camera group. By doing this, I simultaneously placed a camera onto the viewport which will represent the cutscene movement. To add movement, I clicked on the first key that was automatically added and placed the camera to where I want the animation to start.
The duration of the cutscene will be 6 seconds, to finally the cutscene, I placed the camera where I want it to end, simply added a key onto the matinee sequencer and the animation should be complete. However, it simply will not play at this point. Once the process is finished, I renamed the matinee “Cutscene1” (naming conventions are especially important to distinguish from other similar objects!).
The animation won’t trigger as the Event simply starts at the Main Menu level of the game instead of the playable level; therefore I added simply added a trigger box within the player start section of the game, when I press play the cutscene will play as soon as the actor spawns.
Within the level blueprint, I simply added a OnActorBeginOverlap for the Triggerbox which will trigger the cutscene, I created a reference to Cutscene1 and connected to a play event which I finally connected to the Triggerbox. Once again, the animation will not play. To get it to play, I created a director group within Cutscene1’s matinee, added a keyframe which will then apply the cutscene’s camera. This should now play as normal.
Cutscenes with Matinees


Creating the Minimap


The minimap is fairly simple to create, the purpose of this is to showcase my knowledge of non-diegetic UI representation within a level. To begin the Minimap, I first created the sprite which I will use for the player icon, the software I used was simply Microsoft Paint and created a green square. I saved the image and simply imported the file onto the contents section. From there, I converted the icon into a sprite.
Now the I opened the third person character blueprint, in the viewport, I added a new component called “SpringArm” which act as camera boom. I adjusted the SpringArm to -90 degrees this will move the SpringArm pointed directly below the character. Within the SpringArm component, I added a “scene capture component 2D”.
I will now add a render target, by doing so I right clicked onto the contents section > materials and textures > render target. By Returning to the third person blueprint, within the viewport and the details section, there will be a scene capture tab. By expanding the texture target, the render target previously created will show there.
Going back to the level blueprint, I right clicked onto render target and selected on “create material”. By going to the minimap render target material, on the left-hand side of the details section will show the Materials tab, I changed the material domain from “surface” to “user interface”. When this is done, I then connected the texture sample to the final colour.
I then created the UI widget; this is done by right clicking onto the contents section once more > user interface > widget blueprint. Opening the widget blueprint, I then grabbed a image from the palette on the left-hand side, and moving over to the right, I resized the image to an appropriate size as well as changing the image to the minimap render material I created from the render target.
To make it show in gameplay, I had to create a logic for the minimap, as soon as the player enters the game via main menu, the minimap will simply appear immediately. I then opened the character blueprint, and within the SpringArm I turned the inherit pitch, yaw and roll off and within the scene capture component, I changed the projection type from the perspective mode to orthographic and increased the ortho width to 2000.
To move to the final stage of the process, I then opened the character blueprint’s event graph, on the details section, I scrolled down to scene capture, on the very bottom, clicking on the arrow will show the advanced options, on the general show flags, I remove the “show skeletal meshes”, this will remove the character from the minimap. On the viewport,
I clicked on the SpringArm and added a new component called “sprite” and on the details panel, I scrolled down to the sprite tab and chose the player icon I imported and converted to a sprite. To ensure that it does not show above the player when playing, I scrolled down to rendering, clicked on the arrow below, and click on “owner no see”.
Puzzle (animating and logic)
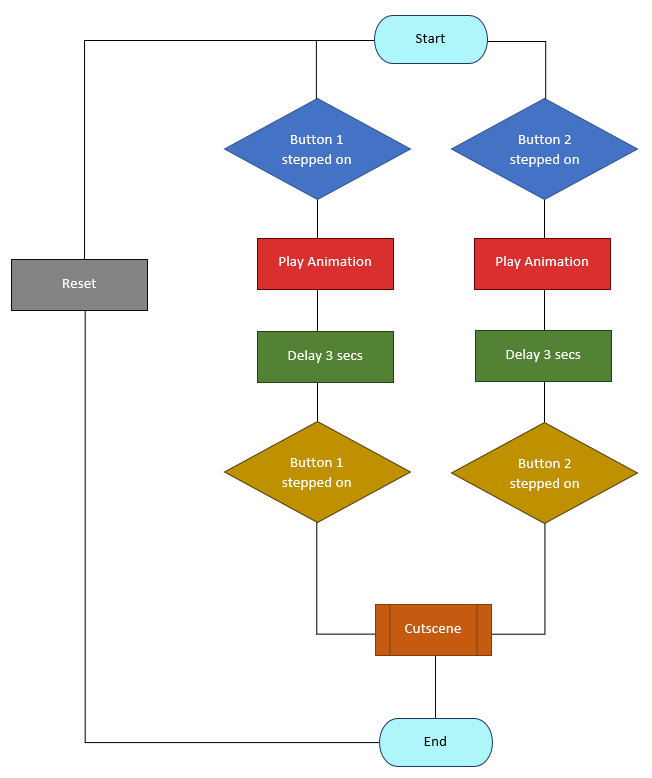

Puzzle I created for this level is a simple one, it consists of two buttons: one red and one blue. To complete the puzzle, the player must press the red one first and then the blue. The button plays an animation when it is triggered. If the opposite buttons were pressed, blue and then red, the animation will be reversed.
I created this puzzle so when both buttons are pressed in order, the stone wall that opens towards the exit, which is also a spatial area. I first created two buttons with a cube shape, I then textured both red and blue. After I placed them both on their corresponding places, I placed a trigger box on top of the cubes that will trigger an animation when I step on them.
I used a matinee to animate the buttons, I first clicked on the button on the viewport, then renamed to “Button1” along with the matinee, which I also renamed “ButtonAnim1”. With the naming convention implemented, the buttons were ready to be animated. I created a new group and with that I placed a movement track
First the matinee window has a sequencer that allows for keys to be added, with the buttons selected the, I added key on the very beginning of the sequencer right under the movement. I reduced the time to approximately 1.5 seconds to allow the animation to play. And at the very end of the sequence, I went to the viewport and moved the button slightly pushed down onto the ground, I returned to the matinee and placed a key at the very last sequence.
With the animation finished it was time to apply the logic behind the puzzle. Within the level blueprint, I started the sequence by creating a true or false statement when the button is activated it should play both the cutscene and the door opening at the same time. I then connected it to a sequence which allows the buttons to be delayed for 4 seconds if a mistake is made i.e. buttons pressed in the wrong order.
I then created a begin overlap on both buttons trigger boxes which plays the animation when stepped on. Connecting to both matinee animation for the button as well as the sound when activated, I then connected it to a branch which states true or false, true being the button1 pressed first and button2 second, when buttons are pressed in the wrong order however, it is simply false.
Assets (Concept sketches, WIP and Completed models)


For my assets, I chose something that is not too complex, crates, barrels, carts, fences, fence gates and a wooden shack. Witch the asset pack I chose for this project, these assets I created are a good fit for the overall aesthetic that I went for. Creating the assets would require a separate software, then exporting the finished product onto unreal.
I first started with the crate, creating this asset is very simple, using a cube, I resized it to its appropriate size and added a couple of details by extruding faces and adding a couple of edges to create intricate details to make it realistic.
The barrels were slightly difficult to make, I started with a cylinder and added subdivisions, this creates the side panels, I also added two extra cylinder shapes, two is placed in the middle and top of the barrel, to create a barrel rings. I then created an extra circular edge on top of the barrel to create the lid of the barrel.
The next model is the cart. This may look complex; however it is far from that, with a couple of cube and cylinder polys, it is one of the simpler assets to create, the cart I went for is a pull cart with two wheels, this asset is very fitting with all the barrels and crates that are scattered all throughout the game.
Created using several cubes both the gate and the fences use the same poly shapes to create them, these were the easiest to do out of all the assets I have made. I also rendered all the assets with a wireframe texture.
The concept sketches started off with a few ideas, the fences started off as a metal wire fence with a barbed wire, but I wanted to change it into fit into the western feel to the game. A steel wire fence has a modern touch to it. The idea for the carts I got from several video games such as Red Dead Redemption and Call of Juarez, others from images from the internet.
The final renditions of the assets were final imported onto unreal, I exported each one of them one by one. In Maya, by selecting each one of them, I went to file > export selection > find the folder where the project is located > place under imports folder and the items should now appear in the contents section below the viewport. However, before the importing process, I resized them to make it every asset larger, this prevents any graphical issues with the objects.
Level greybox


Level concept and top down sketch


Level screenshots


References:
Stylized Desert Environment (2018) Available at: https://www.unrealengine.com/marketplace/en-US/product/stylized-desert-environment (Accessed: 12 February 2020)
e-maze-in (2020)

Available at: https://www.hackerearth.com/practice/basic-programming/input-output/basics-of-input-output/practice-problems/algorithm/e-maze-in-1aa4e2ac/description/ (Accessed: 14 May 2020).
Single footstep, shoe, work boot on grit and small stones, dirt track. Version 4 (2019) Available at: https://www.zapsplat.com/page/3/?s=work+boot&post_type=music&sound-effect-category-id (Accessed: 15 May 2020).
Single footstep, shoe, work boot on grit and small stones, dirt track. Version 3 (2019) Available at: https://www.zapsplat.com/page/3/?s=work+boot&post_type=music&sound-effect-category-id (Accessed: 15 May 2020).
Rock or stone tomb door close, thud (2019) Available at: https://www.zapsplat.com/?s=tomb+door&post_type=music&sound-effect-category-id= (Accessed: 16 May 2020).
Heavy stone door drag and slide with dust and debris falling, could be tomb door 2 (2019) Available at: https://www.zapsplat.com/?s=tomb+door&post_type=music&sound-effect-category-id= (Accessed: 16 May 2020).
Wind blowing through cactus plants in desert (2019) Available at: https://www.zapsplat.com/?s=desert+wind&post_type=music&sound-effect-category-id= (Accessed 16 May 2020).
Stylized Desert Environment (2018)

Available at: https://www.unrealengine.com/marketplace/en-US/product/stylized-desert-environment (Accessed: 19 May 2020).